Tuesday 25 October 2011

Web 2.0 Propaganda poster assignment


The Brief
You will produce at least one poster promoting as aspect of Web 2.0 Social Media which can be printed at up to A1 size.  You should choose social media from the following list or discuss an alternative with your tutors:
  • Facebook
  • Twitter
  • Flickr 
  • Google+
  • LinkedIn
  • Blogger
  • Vimeo
  • YouTube
The design must be based on propaganda posters from a period of the twentieth century.  You will research, collect and analyse examples of propaganda posters then generate ideas which match these to social media services, creating a suitable slogan which links the design to the service being promoted. 
You will generate ideas for this project based on research and design development techniques (such as brainstorms, mood boards, sketches) and you will prepare a pitch which puts forward your proposed design solution with a review of how you reached those decisions.  You need to explore type choices, colour palettes, poster designs and layouts in this pitch.  Illustrator work in progress can be shown as part of this.   
Your colour palette, graphic style and type choices must reflect the style and content of posters from your chosen period. The graphics will be entirely vector and you will create the artwork in Illustrator at A1 size.  
You will keep a blog of research materials and project development, including research into propaganda posters, placing these into their historical context and analysing their design characteristics, design decisions, problem solving, software techniques, comments on drafts and crit, with notes on changes and improvements made in response to feedback.  
You will also develop a sketchbook of visual research and analyses, sketches and idea development, experimentation in things like colour schemes, typography, drawing style, and proofing.     
For this project we will be making an A1 poster promoting a aspect of web 2.0 social media such as Facebook, Google + etc, the style of the poster will need to be designed and based around propaganda posters from the twentieth century. I will be using illustrator to draw up any content and i will also be using it to build the propaganda poster. I will be documenting my work in my blog as well as a sketchbook, using the sketchbook will mean it will be easier for me to quickly jot down ideas and sketches that I come up with, I and others will also be able to see how my ideas developed though out the project.

There are three deadlines in which I need to meet for this project, the first is for the presentation which is on the 11th of November, the presentation will be used to show how my researched developed into ideas and how I developed those ideas, I will also need to show some of my final designs that I plan to implement into my posters.

The second deadline is class crit which will be on the 25th of November, I will show my poster/s to the class for them to be assessed, with the feedback I can make any changes to my poster that i deem necessary as I only have a short time between this deadline and the next.

Final submission is at 4pm on monday the 28th, I will need to have all my work uploaded and have my sketchbook and blog finished.

From looking at a few propaganda posters I have already thought of a few ideas I would like to develop.

Thursday 13 October 2011

Crit


The overview that I got from class Crit:

The one with the arches would have been nice rotated so that it played the right way up.
I did try to rotate the arches but i had no luck, perhaps with a little more time and research into the code I may have been able to change it, I plan to look into changing it.

There is sometimes not a lot going on in the images.
Most of my panoramas had one focused point in the image, as I have said in my evaluation I would like to have repeated what I have done with arch one where I have something happening all round the panorama.

Some ghosting that needs changing.
Looking at the images on the projector you can see some points that need to be looked at and some colours that need to be blended better.

Overview - Evaluation

http://jamie-skinner.com/panoramas/Windmill.html     http://jamie-skinner.com/panoramas/Viaduct.html

I liked my final images that I produced and I think that the locations I choose were good for the time frame that I had, looking back now I would have liked to have done more of a 360˚ panoramas that cross the horizon (up and over) as thought that the one that I did like this was the best one.

My other two panoramas I enjoyed doing but I preferred the second viaduct one that I did, the only problem I had with this one is that opposite the viaduct there was not really much going on so perhaps it wasn't the best place to shoot however, I did want to shoot so that I covered as much as the viaduct as a whole.

If I did do this again I would of definitely do repeat the same process that I did with my first up and over one, i would chose locations that were similar to the arches one so that they have interesting points all the way around.

Stitching some of the images was the hardest part out of the whole process from shooting to adding the images to the code, some of the images fitted together well but others were a little hard as there were bushes and tress with in the join.


For the one above for the floor I had to duplicate it as was extremely hard to get a shot of it as I could not get enough height to the picture, so for the floor I had to take one shot and then duplicate it.
Also the sky in the original image was very bleached out so i had to replace it.


For this image as you can see the sun is very prominent in the image so blending in the sky was quite difficult, also for this shoot I placed the tripod onto of my car so the images were not matched up as well if they had been shot on the ground. I also was debating weather to include the train in this panorama as I had photographed everything twice, for example the people, bike and train were in the two rotations that i made.


This image again has bright sunshine it but luckily it mostly against the hill rather than the bushes and tress so it was easier to blend in, the only part that I can really see that I need to change is where the bush on the left hand side doesn't really blend in well with the sky.


This panorama the sun was so bright and it casted rays on a few of my images, I had to cover it up with my hand so that there were no rays on the image, I then used a patch of sky to cover the hand up.

Some of these images do need a little looking at as looking at it as a whole you can see lighting differences.


Stitching images - Problems and Fixes

I had a few problems when sticking my images together, the thing that I had most problems with was trying to match the colour of the sky with another image when there was something like a bush in the way. I had to kind of fade in around it but it still isn't exactly how I want it and looks.

Coloring images - Photoshop Techniques

When taking my images as I rotate the camera around due to where the sun is some of the sky will appear brighter or darker depending on where the sun is when I shoot. In photoshop there are numerous ways to match the colours of each image.

The first way is to use curves:


When you apply curves to a layer you can change individual colours Red, Green and blue or all of them at the same time, by bending this curve you change the way the image looks. You can add multiple points to fine tune the colours and by moving the curve top left it darkens it and then bottom right it lightens it, by changing the individual colours you can adjust how bright that individual colour is without changing any other colours.

Another way to adjust the colours is with levels, similar to curves you change the individual colours within the image, with this setting you can increase the amount /strength of the colour so by changing multiple colours you can math the images together.

Shooting - Picture results

I am pleased on how my images came out from each of my shoots, I had a few problems with a couple of my panoramas, on two of them the sun was quite hard to work around as it really changed the colours of each of my images so a lot of tweaking had to be done with the images.

On the shoot with the windmills I could not get enough height with the camera so I didn't get as high as I wanted, with the viaduct I could get the tripod on top of the car to get a little higher up.


I tried to do a portrait shot for this panorama like I did with the others but the sun gave off to many rays so I had to cover the sun up.


Shooting - Problems Foreseen

Before shooting I thought that it would be a good idea to go over any problems that I may have when shooting, this way as I am travelling out a bit it will mean that I will not have to go back and reshoot.

The first thing to address is the time of day, I think that the best time of day to shoot would be when the sun is low, so early morning or late afternoon would get the best results. By shooting when the sun is low I hopefully won't have the sun in my images which will really change the colours of each image and make  sticking easier.

When I shoot the viaduct I want to get as much height in the image as possible, I am planning to shoot portrait this way I will get a lot more content within my image.

The weather will play a big part when choosing the day to shoot, ideally I would like it bright as this will bring out the colours, also a clear day would be best as a cloudy sky doesn't photograph as well and looks boring.

Delivery - Stitcher (interactive, zoom etc.)

Delivery - Stitcher (interactive, zoom etc.)

I am wanting to go a bit further than using the code given, I have downloaded a trial of Autodesks stitcher and applied it to my first panorama.


Its quite a good piece of software and has some good features to it but i have found that it is quite temperamental at times.

Delivery - Coding

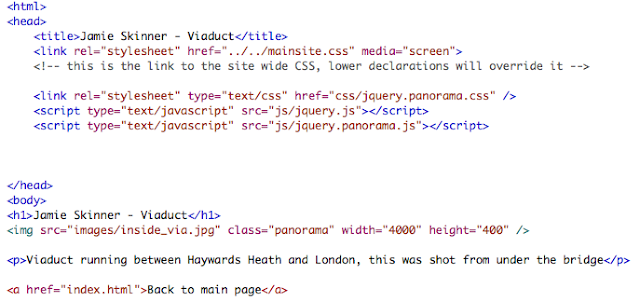
I have been looking at the code and determining what parts of code do what:


Jamie skinner - Panorama


VR panoramas project - September 2010


This part of the code taken from the index page displays the links that go to each individual panorama, the part in red I changed to display the name of the panorama, the part in bold italics I added as I had four panoramas.


The start position here determines where the position of image starts on the screen,Ii used this so that it shows the interesting parts of the image first, you can also change the direction so that it moves right.
As well as direction and start position you can also adjust the speed to suit the panorama.


The top part of the code links to the query found in the other folder that make thee panoramas for and makes it like a website, the bottom line "jquery.panorma.js" is the jquery that the panorama is run on.
If i wanted to change the code that it links to any change that I made would effect all the panoramas, by duplicating the code and changing the name of it and linking the jquery.panorma.1.js to this code I can then alter any values for the panoramas individually. This means if I want one faster and one slower I can as I have individual codes.


Delivery - Web Delivery

I am designing my panoramas for the web so there are a few things I need to take into account:

Resolution:
The resolution of computer screens is 72 ppi so when saving out my panoramas I need to change the resolution to 72ppi to mach computer screens, if I were printing them I would choose 300dpi.

Size:
I think that an adequate height for my panoramas will be 400 pixels high, this height will give sufficient quality for the display size and keep my image size lowland will load faster. The length will be determined by the image size.

Using a test image my approximate size for each panorama should range from 300kb to 450kb

Techniques - Specialised Software

Autodesk stitcher is a professional piece of software used to stitch and manage images for panoramas, you can import your photos directly into the software and the it will stick them together for you and then create an interactive panorama. You can also add in your own panorama image and get stitcher to turn it into an interactive vr.


http://usa.autodesk.com/adsk/servlet/
pc/inde?id=11390049&siteID=123112

I used this program to turn my panoramic images into quicktime Vr's
A helpful process that this program has is that when taking cubic panoramas you need to have an image to cover up the tripod, which this program does for you.

Techniques - Destructive vs Non-Destructive

In photoshop there are lots of ways to carry out certain tasks, the ones I will mostly be using will be layer masks to blend my images together, I will also be using curves and levels to match the colours and lighting of each image.

The first technique I will be looking at is blending my images together, the two methods I know of is using the eraser tool (destructive) and using layer masks (non-destructive).

Layer Masking:

Layer masking is where a layer mask is placed over the layer then when you paint black the image it masks it out, so when I want to blend my images together I will paint black on the edge of one of the images so that it blends in. Using a layer mask over using the eraser has it benefits, with layer masks you can also paint the image back in if you still have the layer mask separate from the image. As you always have the whole image it makes bringing back any part of the images later a whole lot easier than restarting or bringing back individual pictures.

Erasing:

Using the eraser will literally erase pixels which you cannot get back later so for blending images the layer masking technique works best.


(Destructive) Curves vs (non-destructive) Curves

There are two ways of applying curves, one destructive, one not. The destructive way once applied you cannot go back and change the settings, you have to reapply the adjustment setting again and again and each time you do this you are losing data.

The non-destructive way of doing it is to apply it in the similar way a to a layer mask, doing this however does effect every layer below it, this can easily be changed so it effects only the layer you intend it to.
Using this method means that at any time you can change the settings and every time you back to the curve mask all the original settings will still be there.


There are some times where it is better to use destructive methods instead of non-destructive methods.
When taking the pictures at different positions some points of the image may not match up, I would then have to warp the image to match.

The method i will be using to match my images will be warping which is destructive, each time i warp an image I will lose data so i need to use it in one stroke so that I do not lose to much quality.

Further Research - Jeffrey Martin

The first panorama I saw by Jeffrey Martin was a huge 80 gigapixel panorama!
You can zoom into images that are over a mile away and still have a good quality image.


http://www.dailymail.co.uk/sciencetech/article-1330811/The-incredible-360-degree-panoramic-photo-London.html
This image really amazed me, the sure size and image quality is amazing. This in-particular panorama took three days to shoot and you can literally zoom in for miles, Big Ben pictured here is 1.5 miles away


http://www.dailymail.co.uk/sciencetech/article-1330811/The-incredible-360-degree-panoramic-photo-London.html

Another example of his work is the one at a football game, he shot a 360˚ panorama and then once the image was finished and stitched he uploaded it to Facebook and got people to tag themselves in it, in total he got over 17,000 tags.


Both this panorama and the football game would be extremely hard to take and stitch, for the London image it took three days to just take the images, I can imagine the different lighting that would effect each image dramatically, it would be a nightmare to shoot.


For the football game there were a thousand images that needed to be stitched, I would imagine the London was in the tens of thousands.

Decision - Final Locations


The locations I have finalised upon are the ditching windmills and the viaduct.
For the viaduct I am wanting  to shoot from under it and cross the horizon, I plan on standing under one of the many arches, this will mean that I am higher up so I will have a more interesting shot from high to low than if i were to shoot ground level.
If I were to shoot at ground level I would have a big patch of grass in my panorama which I do not want, so if I shoot from on top of one of the inner arches I will have a lot less grass and have a small piece of brick where I would stand this would not effect my overall panorama as much.

When I do shoot my images from on top of the arches I will capture where the arch joins to the body of the bridge, this is quite an unusual patten that I would like to capture and include within the 360˚ panorama.

For the second image I have decided that I will shoot from across the road, this way I am far back enough to capture the full height of the viaduct and also get in some of its surroundings The only problem I see is when taking the pictures is that it may be too low even with a tripod, I am thinking of placing the tripod ontop of a car to raise it up just that little bit more that way I can get the viaduct more centred within the panorama.


The second place I have decided on is the Jack and Jill windmills, there is a path that leads from one of the windmills to the other side of the downs and I think that I will stand and shoot so that I get part of the windmill in and then the path across to the downs, usually there are also a lot of walkers around so it might be good to capture some some people in my panorama. There is a place where there is an old wooden sign that I would like to incorporate into the image so that you can see where it was taken.


View Larger Map

Ideas - How I will shoot the location


When I shoot i will need to make sure that I have the camera completely level, if i don't my images will have slightly different angles from one image to another, another thing is that some images will have less/more of the top/bottom which means that i would have to crop the image quite a lot so i do not having parts missing in the panorama.

Not having the camera level will end up as this effect:


Each red square resembles one image, if the camera in not perfectly flat it will create this effect with the images,you would then have to crop like this:


The blue lines here are where I would have to cut the images, if you did this the end result would be a very thin panorama.

If your camera is not positioned and levelled correctly it will do this motion, taking a picture at each interval will get you an images like the diagram shown above.


Once your camera is levels your photos will be easier to stick together

How many images should I take?


I have found out that the more Images I take the easier it will be to sticher them together as there is less of a discrepancy between angles, light, distance etc. If you think of a video camera performing the same task it takes each frame very close together so that then it plays multiple frames together it looks and plays smoothly, we are dealing with the same concept here.

Ideas - Locations


For my panoramic images I want to have two locations in which I will shoot two panoramas at each. The first location I would like to shoot is the viaduct that runs between Haywards Heath and Balcombe, I want to take on a different viewpoint from standard panoramas and instead of shooting across the horizon I want to cross it; this would make it a lot different from most conventional panoramas. so I want to try to shoot from the under the viaduct crossing the horizon in my 360˚ panorama, by doing this I think that it would create a really interesting viewpoint for my panorama. 


For the second panorama at the same location I would like to shoot the viaduct with a more conventional style and go with the horizon; showing both these panoramas together will be a interesting combination as people will mainly see the viaduct from a distance, to see it from a completely different angle and perspective will make it more interesting.


For my second set of images I would like to shoot the Jack and Jill windmills near Ditching, I am not really sure on how to approach taking the pictures of the windmills as its location and height would make it tricky to shoot. Perhaps getting as high as possible to take the picture of the windmill would work best.


View Larger Map


Initial Research - Gigapans

Gigapans are a format of panorama, the best way to describe gigapans is that they are they a similar concept as Goggle earth, as you zoom in new images load, with gigapans the image as a whole is made up of multiple images stitched together so as you zoom in to it the entire image stays pin sharp.


http://en.wikipedia.org/wiki/File:Gigapan-imager.jpg
To take the pictures the camera is attached to a special motorised tripod which at a certain elevation and angle the camera will then take a photo. These tripods can range from hundreds to thousands of pounds.


http://www.activecomp.ca/gigapan/products/gigapan_stitch.jpg
Above is how a gigapan image is made up, each images is taken individually then stitched together.

edited image: http://www.charmedlabs.com/index.php?option=com_content&task=view&id=111
For this gigapan I have taken screen shots at different intervals to demonstrate the zoom ability of gigapans.

Monday 10 October 2011

Initial Research - Panoramas

A panorama is a very wide angled image that is usually created with two or more images.
Panoramas have been around for a very long time and before photographs they were painted.


Here are some examples of panoramas:


http://en.wikipedia.org/wiki/Panorama

As techniques developed and digital editing came into practice panoramic images now look as if they were taken in shot, the earlier photographs would have had to of been matched up manually and not altered which means that you can see the joins clearly.

Another form of panoramas is where the image is manipulated so that it looks as if it is a mini planet, this is quite an easy technique and you can get some interesting results:

http://i.telegraph.co.uk/telegraph/multimedia/archive/01359/pink_1359063i.jpg

http://en.wikipedia.org/wiki/File:Globe_panorama03.jpg

http://www.panoguide.com/howto/panoramas/types.jsp

            Spherical panoramas:

A spherical panorama is where the images taken are projected and stitched to the inside of a sphere, this means that as you move around (on the spot) you can turn 360˚ to look at anything, however, it does have its disadvantages.
As you look down towards the ground it will seem that the images are being squished as the images meet and join, also the images need to go all the way around so that they join up end to end, this way as you pan around there is no blank space.


Cylindrical panoramas:


Cylindrical panoramas is the standard type of panorama, it is simply done by setting up a camera on a tripod and taking images at separate intervals then using a program to stitch them together. This type of panorama can either be displayed in a continuous cylindrical motion or it can be user operated. For example there could be zoom controls or the user can drag manually around the panorama.


Cubic panoramas:
Cubic panoramas are much preferred over spherical ones as the image is not distorted, this means wherever you look objects don't look squished. As the cube has 6 sides when the panoramic images are placed on these and looked at they look natural to the human eye as there is no distortion.